Tensorflow insights - part 5: Custom model - VGG - continue
In the last part, we have shown how to use the custom model to implement the VGG network. However, one problem that remained is we cannot use model.summary() to see the output shape of each layer. In addition, we also cannot get the shape of filters. Although we know how the VGG is constructed, overcoming this problem will help the end-users - who only use our checkpoint files to investigate the model. In particular, it is very important for us to get the output shape of each layer/block when using the file test.py.
All efforts in this post are made to achieve a final big goal which is that we can run the file test.py with the VGG architecture. The trained model (checkpoint files) we use in this post has been saved in the folder models when we previously trained the "modified" VGG network on the 3-class Stanford Dogs dataset. If you haven't read part 4 of this series, come back to it because this post is basically based on the information developed in the previous post.
Below, we gradually go through some modifications to test.py. Every modification is important, so you should read it thoroughly before coming to the next one.
Import and build the VGG16 architecture
As usual, we will start from the last state of the code in part 4.
First, we need to import the class VGG16Net into test.py.
from networks.vgg import VGG16NetRecall that in the current state of test.py, we have a function to construct the old network architecture which has 3 convolutional layers and 2 dense layers. Then, we call this function and assign it to the variable model. The final thing is to load weights from checkpoint files for the model.
def create_model():
    model = tf.keras.Sequential([
        tf.keras.layers.Conv2D(8, 7, activation='relu'),
        tf.keras.layers.Conv2D(8, 5, activation='relu'),
        tf.keras.layers.Conv2D(8, 3, activation='relu'),
        tf.keras.layers.Flatten(input_shape=(32, 32, 3)),
        tf.keras.layers.Dense(128, activation='relu'),
        tf.keras.layers.Dense(3, activation='softmax')
    ])
    input_shape = (None, 128, 128, 3)
    model.build(input_shape)

    model.compile(loss='categorical_crossentropy', optimizer=Adam(learning_rate=1e-4), metrics=['accuracy'])

    return model

model = create_model()
checkpoint_path = os.path.join(args["model_path"], 'models')
model.load_weights(checkpoint_path)
As the VGG architecture has already been defined by the class VGG16Net, we just simply call it without the necessity of creating the function create_model like above. The other things are the same as before. After reconstructing the network, we build model and load weights.
model = VGG16Net(num_classes=3) # Construct the VGG network for 3-class classification
input_shape = (None, 224, 224, 3)
model.build(input_shape) # Build model
checkpoint_path = os.path.join(args["model_path"], 'models')
model.load_weights(checkpoint_path) # Load weights
Now run the ./test.sh, there will be an error when we try to print the layer.output.shape:
Traceback (most recent call last):
  File "test.py", line 44, in
    print('[**] layer.output.shape: {}'.format(layer.output.shape))
  File "/home/aioz-huy/miniconda3/envs/learn_tensorflow/lib/python3.8/site-packages/tensorflow/python/keras/engine/base_layer.py", line 2105, in output
    raise AttributeError('Layer ' + self.name + ' has no inbound nodes.')
AttributeError: Layer vgg_block has no inbound nodes.
Solve the problem "AttributeError: Layer vgg_block has no inbound nodes"
There is a problem with the output shape information of each layer. We can verify it by using the model.summary(). Let's add the model.summary() right after the model is built:
model.summary()And here is the result, all of the output shapes are "multiple":
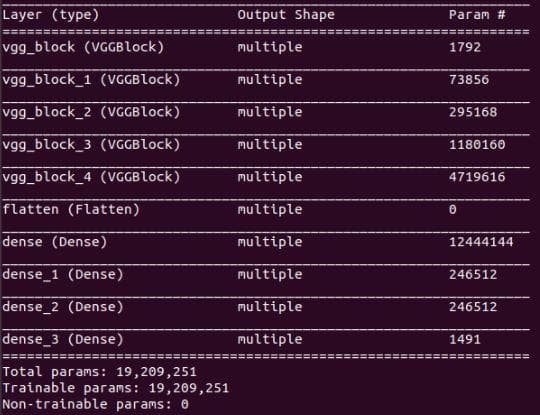
Figure 1: The result of model.summary().
Indeed, the tf.keras.utils.plot_model() in train.py also returns a weird plot.
Figure 2: The result of plot_model().
This problem seems to be at the essence of Tensorflow. There is even a topic for it (issue link). Briefly, it is related to the static graph of layers in Tensorflow. In a Functional or Sequential model, we can get the input shape or output shape of each layer because these models are static graphs of layers, whereas there is no graph of layers in the case of a subclassed model (read this) [1].
One way to solve it, more likely a trick, is to create a method model in the class VGG16Net. This method explicitly infers the model by knowing its inputs and outputs [2]. You might have been familiar with this type of constructing a network. Right, this is the Functional model in Tensorflow, which allows us to have the static graph of a defined network, thus giving us the information about the output shape of each layer.
def model(self):
    x = tf.keras.layers.Input(shape=(224, 224, 3))
    return tf.keras.Model(inputs=[x], outputs=self.call(x))
The rationale behind the solution is when the self.call() is invoked on the input x, the shape computation is executed for each layer. Besides, the tf.keras.Model instance also compute shapes which are returned in model.summary(). One drawback is that we have to define the input shape manually (look at the variable x inside the method model). Here, the input shape is the same as specified in the train.py.
In test.py, replace model.summary() with model.model().summary():
# model.summary() # old
model.model().summary() # new
We also need to modify the loop which is right below the line of loading weights. In the loop, we comment out the if statement as there is no layer with "conv" in its name. And add a line for printing the length of the returned list of layer.get_weights(). This information is not used immediately but will be used below.
for idx, layer in enumerate(model.layers):
    print('[*] layer: ', layer)
    # if 'conv' not in layer.name: # Temporarily comment out these 3 lines because there is no 'conv'
    #     print('No')
    #     continue

    print('[**] len(layer.get_weights()): ', len(layer.get_weights())) # ADD this line
    filters_weights, biases_weights = layer.get_weights()
    print('[**] id: {}, layer.name: {}, filters_weights.shape: {}, biases_weights.shape: {}'.format(idx, layer.name, filters_weights.shape, biases_weights.shape))
    print('[**] layer.output.shape: {}'.format(layer.output.shape))
    filters_max, filters_min = filters_weights.max(), filters_weights.min()
    filters_weights = (filters_weights - filters_min)/(filters_max - filters_min)
    # print('[**] filters_weights: ', filters_weights)

    plot_filters_of_a_layer(filters_weights, 3)
Now, run again the test.sh. Below is the new result of model.model().summary():
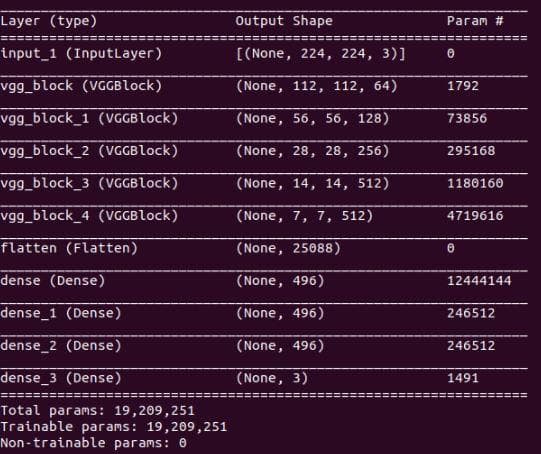
Figure 3: The result of model.model().summary().
Printing information of the following loop also seems to be very good, except that there is an error when the iteration at the last VGG block happens:
[*] layer:
[**] len(layer.get_weights()):  2
[**] id: 0, layer.name: vgg_block, filters_weights.shape: (3, 3, 3, 64), biases_weights.shape: (64,)
[**] layer.output.shape: (None, 112, 112, 64)
[*] layer:
[**] len(layer.get_weights()):  2
[**] id: 1, layer.name: vgg_block_1, filters_weights.shape: (3, 3, 64, 128), biases_weights.shape: (128,)
[**] layer.output.shape: (None, 56, 56, 128)
[*] layer:
[**] len(layer.get_weights()):  2
[**] id: 2, layer.name: vgg_block_2, filters_weights.shape: (3, 3, 128, 256), biases_weights.shape: (256,)
[**] layer.output.shape: (None, 28, 28, 256)
[*] layer:
[**] len(layer.get_weights()):  2
[**] id: 3, layer.name: vgg_block_3, filters_weights.shape: (3, 3, 256, 512), biases_weights.shape: (512,)
[**] layer.output.shape: (None, 14, 14, 512)
[*] layer:
[**] len(layer.get_weights()):  4
Traceback (most recent call last):
  File "test.py", line 43, in
    filters_weights, biases_weights = layer.get_weights()
ValueError: too many values to unpack (expected 2)
Solve the problem "ValueError: too many values to unpack (expected 2)"
The traceback points out that there are too many values to unpack at the line of getting weights. Moreover, we can see that this happens at the iteration of the last VGG block (see the layer id). To know exactly the number of elements returned by layer.get_weights(), we can now take advantage of the printing line that hasn't been used above. In the output above, you may notice this line:
[**] len(layer.get_weights()): 4 While the previous iterations only have 2 elements from layer.get_weights(), the last VGG block has twice as many as them. Why is that? Looking at the VGG architecture we specify at the end of part 4, you can see that each of the first 4 blocks has only 1 convolutional layer while the last block has 2 convolutional layers. This is the reason why the layer.get_weights() returns 4 for the last block.
self.block_1 = VGGBlock(conv_layers=1, filters=64)
self.block_2 = VGGBlock(conv_layers=1, filters=128)
self.block_3 = VGGBlock(conv_layers=1, filters=256)
self.block_4 = VGGBlock(conv_layers=1, filters=512)
self.block_5 = VGGBlock(conv_layers=2, filters=512)
self.flatten = tf.keras.layers.Flatten(input_shape=(7, 7, 512))
self.dense_1 = tf.keras.layers.Dense(496, activation='relu')
self.dense_2 = tf.keras.layers.Dense(496, activation='relu')
self.dense_3 = tf.keras.layers.Dense(496, activation='relu')
self.classifier = tf.keras.layers.Dense(num_classes, activation='softmax')
Let's modify the loop above so it can adapt to this case. In general, everything is the same as before, we just need some modifications to adapt to the case of having more than one convolutional layer in a block. The modified loop will look like below (the idea is simple, you can read in the comment at each modified line):
for idx, layer in enumerate(model.layers):
    print('[*] layer: ', layer)
    if 'vgg_block' not in layer.name: # MOD: Use this condition to ignore the Flatten layer and Dense layers. Note that the string 'conv' is replaced by 'vgg_block'.
        print('No')
        continue
    print('[**] id: {}, layer.name: {}'.format(idx, layer.name))
    print('[**] len(layer.get_weights()): ', len(layer.get_weights()))
    list_of_weights = layer.get_weights() # MOD: replace the filters_weights and biases_weights with only one variable list_of_weights, which is good for the variation in the number of convolutional layers in each block.
    num_weights = len(list_of_weights) # MOD: the number of elements in  ```list_of_weights```. We need to get this to know the nubmer of convolutional layers in the current block.
    for i in range(int(num_weights/2)): # MOD: The number of convolutional layers in each block is equal num_weights/2.
        print('[**] filters_weights.shape: {}, biases_weights.shape: {}'.format(
            list_of_weights[2*i].shape, # MOD: filter weights are at the even index of the list
            list_of_weights[2*i+1].shape) # MOD: bias weights are at the odd index of the list
        )
        filters_max, filters_min = list_of_weights[2*i].max(), list_of_weights[2*i].min() # MOD: get the filter weights by access the even index.
        filters_weights = (list_of_weights[2*i] - filters_min)/(filters_max - filters_min)
        # print('[**] filters_weights: ', filters_weights)
        plot_filters_of_a_layer(filters_weights, 10) # MOD: put the plot filters function inside the sub loop
    print('[**] layer.output.shape: {}'.format(layer.output.shape))
Try running test.sh again, the loop is now okay but we have a new error:
Traceback (most recent call last):
  File "test.py", line 65, in
    model_1 = Model(inputs=model.inputs, outputs=model.layers[0].output)
...
ValueError: Input tensors to a Functional must come from `tf.keras.Input`. Received: None (missing previous layer metadata)
Solve the problem "ValueError: Input tensors to a Functional must come from tf.keras.Input. Received: None (missing previous layer metadata)"
In the current state of the code in test.py, we use the Sequential model to reconstruct a network, but here we use the Tensorflow custom model.
For some reason, the model.inputs is None. It may be due to the use of the custom model. So, we will try defining the input ourselves by using tf.keras.Input:
x = tf.keras.Input(shape=(224, 224, 3)) # The input shape is set to the same as in training stage
model_1 = Model(inputs=x, outputs=model.layers[0].output) # Replace model.inputs with x
We also need to change the target_size of the loaded image from (128, 128) to (224, 224):
# === Output feature maps from a single layer ===
# A PIL object
# img = load_img(os.path.join(args["train_dir"], 'n02085620-Chihuahua', 'n02085620_1558.jpg'), target_size=(128, 128)) # old
img = load_img(os.path.join(args["train_dir"], 'n02085620-Chihuahua', 'n02085620_1558.jpg'), target_size=(224, 224)) # new
Then, run test.sh again.
Traceback (most recent call last):
  File "test.py", line 73, in
    model_1 = Model(inputs=x, outputs=model.layers[0].output)
...
ValueError: Graph disconnected: cannot obtain value for tensor Tensor("input_1:0", shape=(None, 224, 224, 3), dtype=float32) at layer "vgg_block". The following previous layers were accessed without issue: []
Solve the problem "ValueError: Graph disconnected: cannot obtain value for tensor Tensor("input_1:0", shape=(None, 224, 224, 3), dtype=float32) at layer "vgg_block". The following previous layers were accessed without issue: []"
Another error appears! As [3] points out, the ValueError above is because our model requires multiple inputs, but we do not provide enough. But why? Doesn't we only have one input that is a 3-channel image? Thinking again, this is because there must have been an input somewhere in the class VGG16Net, but we have provided one more input which is the x - the tf.keras.Input. Actually, the input layer is in the first block of the VGG network. To solve it, we will not use the variable x anymore, but use the input layer defined by the model itself - model.layers[0].input:
# model_1 = tf.keras.Model(inputs=model.inputs, outputs=model.layers[0].output) # old
model_1 = tf.keras.Model(inputs=model.layers[0].input, outputs=model.layers[0].output) # new
# model_2 = Model(inputs=model.inputs, outputs=list_of_outputs) # old
model_2 = Model(inputs=model.layers[0].input, outputs=list_of_outputs) # new
Try running test.sh, we see that it has succeeded in visualizing the feature maps. Now comes a new error:
Traceback (most recent call last):
  File "test.py", line 93, in
    plot_activation_maximization_of_a_layer(model, 2)
  File "/part5/visualizations/automatic_plot_by_tf_keras_vis.py", line 23, in plot_activation_maximization_of_a_layer
    ActivationMaximization(model,
...
ValueError: Input tensors to a Functional must come from `tf.keras.Input`. Received: None (missing previous layer metadata).
Solve the problem "ValueError: Input tensors to a Functional must come from tf.keras.Input. Received: None (missing previous layer metadata)"
It is practically the same error as above, but at this time, it happens at a different line. It happens in the function plot_activation_maximization_of_a_layer() in the file automatic_plot_by_tf_keras_vis.py. Things are not easy as before because this function is related to the library tf_keras_vis. The problem happens when we call one of the methods of the library:
ActivationMaximization(model,
                        model_modifier=[ExtractIntermediateLayer(model.layers[layer_index].name)],
                        clone=False)
This method receives the model directly as input, hence we cannot do anything to help it access the model.layers[0].input. No difficulty! It looks like we need to turn back to the essence of the problem which is the None of the model.inputs. We have to find a way to elucidate it. Solving this problem is simple than we thought. We just simply assign the model.layers[0].input to model.inputs:
model.inputs = model.layers[0].input
print('[*] model.inputs: ', model.inputs)
model.outputs = model.layers[-1].output
print('[*] model.outputs: ', model.outputs)
Now, try running test.sh again. We have solved the problem above, but then again, we have a new problem :).
Traceback (most recent call last):
  File "test.py", line 120, in
    plot_vanilla_saliency_of_a_model(model, X, image_titles)
  File "/part5/visualizations/automatic_plot_by_tf_keras_vis.py", line 53, in plot_vanilla_saliency_of_a_model
    saliency = Saliency(model,
...
ValueError: Expected `model` argument to be a functional `Model` instance, but got a subclass model instead.
Solve the problem "ValueError: Expected model argument to be a functional Model instance, but got a subclass model instead"
From now on (after the activation maximization), as being specified in part 3, the entire model is used for visualization. Therefore, we just need to directly use the variable model in test.py. The problem above is again related to the library tf.keras.vis. The error is that the library does not accept a subclass model, it needs a functional model.
Similar as model.inputs, we define model.outputs:
model.outputs = model.layers[-1].output # -1 means the last layerNow, let's create the functional model for the class VGG16Net right after the call of plot_activation_maximization_of_a_layer(model, 2). We should also call model.summary() to verify the created model:
model = tf.keras.Model(inputs=model.inputs, outputs=model.outputs)
model.summary()
Note: An alternative way to create the functional model is to call model.model() (the method that we have created above).
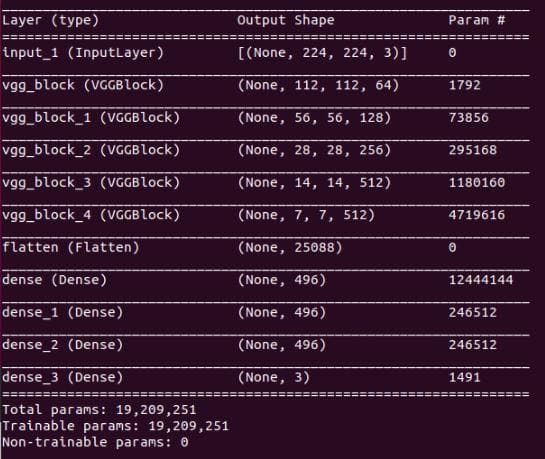
Figure 4: The result of model.summary().
Yes, everything seems to be okay. Try running test.sh.
Traceback (most recent call last):
  File "test.py", line 120, in
    plot_vanilla_saliency_of_a_model(model, X, image_titles)
  File "/media/data-huy/Insights/part5/visualizations/automatic_plot_by_tf_keras_vis.py", line 53, in plot_vanilla_saliency_of_a_model
    saliency = Saliency(model,
  File "/home/aioz-huy/miniconda3/envs/learn_tensorflow/lib/python3.8/site-packages/tf_keras_vis/__init__.py", line 39, in __init__
    self.model = tf.keras.models.clone_model(self.model)
  File "/home/aioz-huy/miniconda3/envs/learn_tensorflow/lib/python3.8/site-packages/tensorflow/python/keras/models.py", line 428, in clone_model
    return _clone_functional_model(
  File "/home/aioz-huy/miniconda3/envs/learn_tensorflow/lib/python3.8/site-packages/tensorflow/python/keras/models.py", line 196, in _clone_functional_model
    model_configs, created_layers = _clone_layers_and_model_config(
  File "/home/aioz-huy/miniconda3/envs/learn_tensorflow/lib/python3.8/site-packages/tensorflow/python/keras/models.py", line 247, in _clone_layers_and_model_config
    config = functional.get_network_config(
  File "/home/aioz-huy/miniconda3/envs/learn_tensorflow/lib/python3.8/site-packages/tensorflow/python/keras/engine/functional.py", line 1278, in get_network_config
    layer_config = serialize_layer_fn(layer)
  File "/home/aioz-huy/miniconda3/envs/learn_tensorflow/lib/python3.8/site-packages/tensorflow/python/keras/models.py", line 244, in _copy_layer
    created_layers[layer.name] = layer_fn(layer)
  File "/home/aioz-huy/miniconda3/envs/learn_tensorflow/lib/python3.8/site-packages/tensorflow/python/keras/models.py", line 61, in _clone_layer
    return layer.__class__.from_config(layer.get_config())
  File "/home/aioz-huy/miniconda3/envs/learn_tensorflow/lib/python3.8/site-packages/tensorflow/python/keras/engine/training.py", line 2231, in get_config
    raise NotImplementedError
NotImplementedError
Solve the problem "NotImplementedError"
Nope, we continue to have an error. It is even harder than the previous cases because the traceback does not output the cause of the error in a clear way. Luckily, there is a topic for this problem link. It looks like we need to override the method get_config(). Note that get_config is a method of tf.keras.layers.Layer, not tf.keras.Model. Therefore, we need to change the base class of VGGBlock to tf.keras.layers.Layer.
In __init__, add **kwargs and remove the argument name:
# def __init__(self, conv_layers=2, kernel_size=3, filters=64): # old
#        super(VGGBlock, self).__init__(name='')
def __init__(self, conv_layers=2, kernel_size=3, filters=64, **kwargs): # new
    super(VGGBlock, self).__init__(**kwargs)
Try running test.sh and this is the error:
TypeError: ('Keyword argument not understood:', 'conv2d_3_64_a')Solve the problem "TypeError: ('Keyword argument not understood:', 'conv2d_3_64_a')"
It looks like our get_config() cannot find the argument conv2d_. Do you recognize the pattern name? That is the name of a convolutional layer in a VGG block according to our naming convention. We do not know exactly the reason, but there is a high chance that it is related to the underlying code of Tensorflow Keras. And it is hard to dig into the lower-level code, so it is better to get away from it. As far as we have come here, we really have made the wrong complex choice at first (in part 4). We should not have used the exec or eval because it is an unofficial way to declare variables in Python. The keyword cannot be found due to the variable declaration by string. No matter what has happened, the use of exec is a neat way to define many variants of network architecture. However, one thing that needs to be emphasized here is that you should always explicitly define the component layers in a custom layer/model. Below is our redefinition of the class VGGBlock:
class VGGBlock(tf.keras.layers.Layer):
    def __init__(self, conv_layers=2, kernel_size=3, filters=64, **kwargs):
        super(VGGBlock, self).__init__(**kwargs)
        self.conv_layers = conv_layers
        self.kernel_size = kernel_size
        self.filters = filters

    def build(self, input_shape):
        self.conv2d_3_64_a = tf.keras.layers.Conv2D(self.filters, (self.kernel_size, self.kernel_size), activation='relu', padding='same')
        if self.conv_layers == 2: # When the block has the second convolutional layer. This is definitely not efficient as before because it cannot be adapted to the case of having 3 convolutional layers in a block.
            self.conv2d_3_64_b = tf.keras.layers.Conv2D(self.filters, (self.kernel_size, self.kernel_size), activation='relu', padding='same')
        self.max_pool2d = tf.keras.layers.MaxPool2D((2, 2), strides=(2, 2), padding='valid')

    def call(self, input_tensor, training=False):
        x = self.conv2d_3_64_a(input_tensor)
        if self.conv_layers == 2:
            x = self.conv2d_3_64_b(x)
        x = self.max_pool2d(x)
        return x

    def get_config(self):
        config = super().get_config().copy()
        config.update({
            'conv_layers': self.conv_layers,
            'kernel_size': self.kernel_size,
            'filters': self.filters,
        })
        return config
You should read the details of how to implement a Tensorflow custom layer in the official document.
Also, remember to change the target_size when loading the 3 input images:
# img1 = load_img(os.path.join(args["train_dir"], 'n02085620-Chihuahua', 'n02085620_1558.jpg'), target_size=(128, 128)) # old
# img2 = load_img(os.path.join(args["train_dir"], 'n02085782-Japanese_spaniel', 'n02085782_2874.jpg'), target_size=(128, 128)) # old
# img3 = load_img(os.path.join(args["train_dir"], 'n02085936-Maltese_dog', 'n02085936_4245.jpg'), target_size=(128, 128)) # old
img1 = load_img(os.path.join(args["train_dir"], 'n02085620-Chihuahua', 'n02085620_1558.jpg'), target_size=(224, 224)) # new
img2 = load_img(os.path.join(args["train_dir"], 'n02085782-Japanese_spaniel', 'n02085782_2874.jpg'), target_size=(224, 224)) # new
img3 = load_img(os.path.join(args["train_dir"], 'n02085936-Maltese_dog', 'n02085936_4245.jpg'), target_size=(224, 224)) # new
Run test.sh one more time and this is the last error:
Traceback (most recent call last):
  File "test.py", line 129, in
    plot_gradcam_of_a_model(model, X, image_titles, images)
  File "/media/data-huy/Insights/part5/visualizations/automatic_plot_by_tf_keras_vis.py", line 101, in plot_gradcam_of_a_model
    cam = gradcam(score,
  File "/home/aioz-huy/miniconda3/envs/learn_tensorflow/lib/python3.8/site-packages/tf_keras_vis/gradcam.py", line 89, in __call__
    model = ModelModifier(penultimate_layer, seek_penultimate_conv_layer)(self.model)
  File "/home/aioz-huy/miniconda3/envs/learn_tensorflow/lib/python3.8/site-packages/tf_keras_vis/utils/model_modifiers.py", line 129, in __call__
    raise ValueError("Unable to determine penultimate `Conv` layer. "
ValueError: Unable to determine penultimate `Conv` layer. `penultimate_layer`=-1
Solve the problem "ValueError: Unable to determine penultimate Conv layer. penultimate_layer=-1"
By default, the GradCam function of tf.keras.vis seeks the last convolutional layer in the network architecture if the penultimate_layer is set to -1. However, here we do not have Conv layers because everything has been put into a block. Thus, we do not want it to seek automatically by setting the seek_penultimate_conv_layer to False. Moreover, we have to point out what is the penultimate_layer. We choose the last VGG block "vgg_block_4" as the penultimate_layer (you can get the layer name from model.summary()):
cam = gradcam(score,
                X,
                seek_penultimate_conv_layer=False, # new
                penultimate_layer='vgg_block_4') # new
Similarly, we also modify like above for all the other visualization methods in the file automatic_plot_by_tf_keras_vis.py.
Now, run test.sh and watch some visualization results.
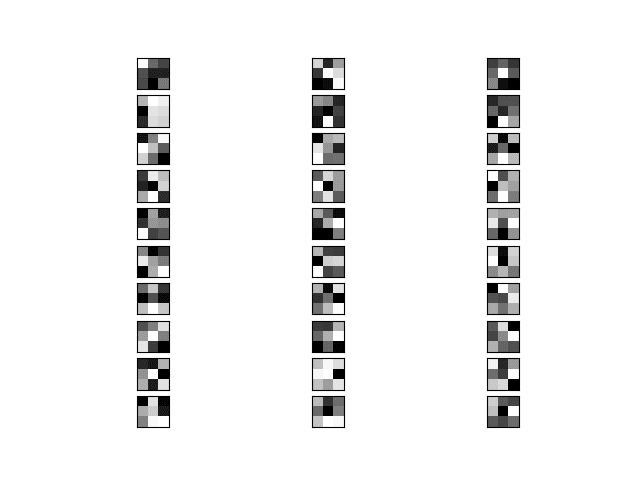
Figure 5: The first 10 filters of block 4.

Figure 6: The first 64 feature maps of block 2. They are like the visualization images in the post 3. Some contain edge information and some have the dog shape vividly appears.

Figure 7: The first 64 feature maps of block 5. The feature maps are at a higher level than the ones above. At this stage, we hardly recognize what is printed in the heatmaps.
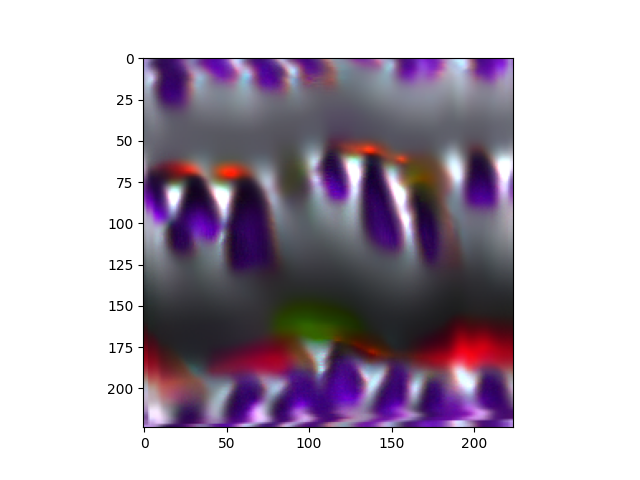
Figure 8: The activation maximization map of the last conv layer (the last block). The picture has more colors, but still we cannot understand it.
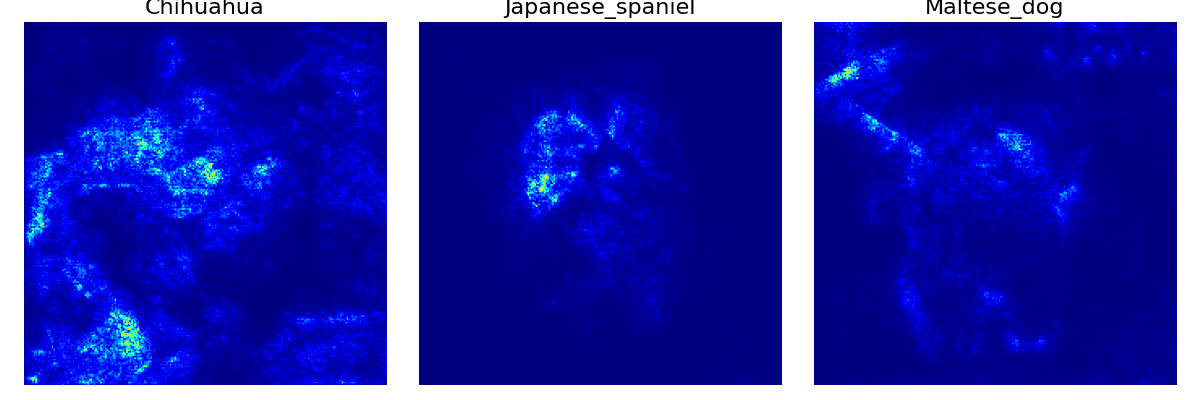
Figure 9: The Vanilla saliency of the last conv layer (the last block).
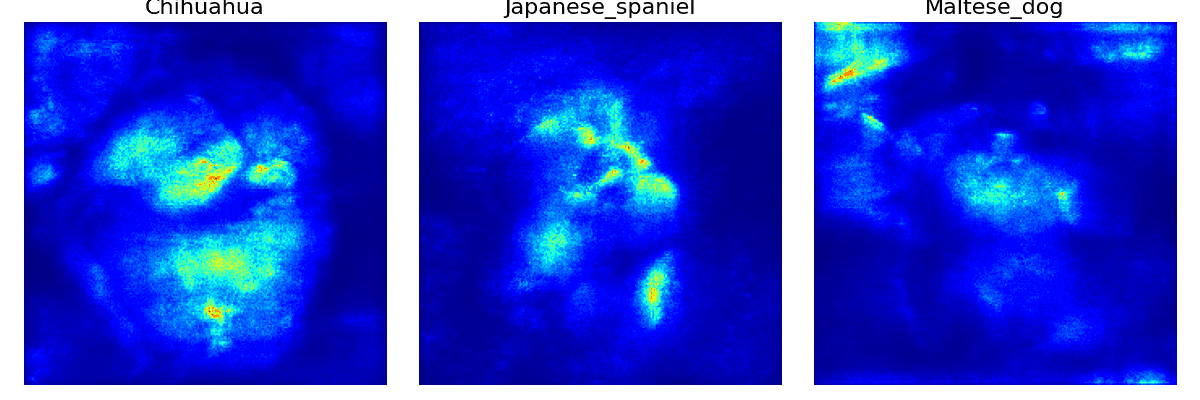
Figure 10: The SmoothGrad of the last conv layer (the last block). This seems not a good visualization because the attention information does not focus on the right patterns to discrimate the 3 dogs. It is worse that the third image focuses on the background (the top left region).
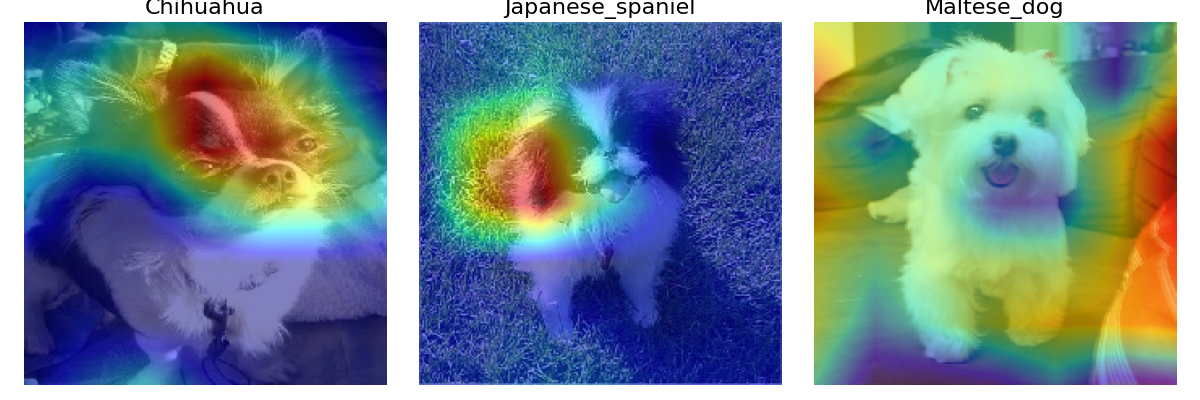
Figure 11: The GradCAM of the last conv layer (the last block).
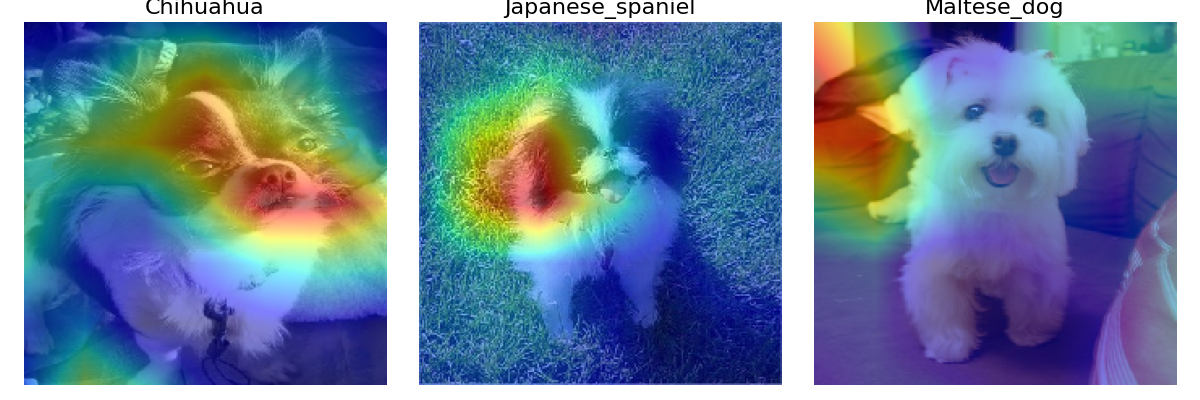
Figure 12: The GradCAM++ of the last conv layer (the last block).
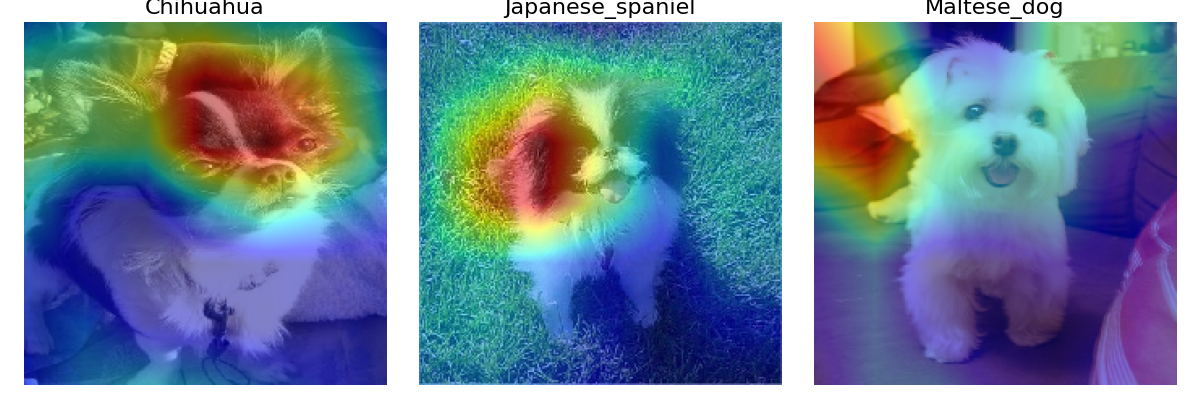
Figure 13: The ScoreCAM of the last conv layer (the last block).
All the Chihuahua images in Figures 11, 12, and 13 have a strong heatmap on the dog's face. For Japanese Spaniel, the heatmap is on the region that has both black fur and white fur. And like in the SmoothGrad, heatmaps lie in the background for all three Maltese dog images.
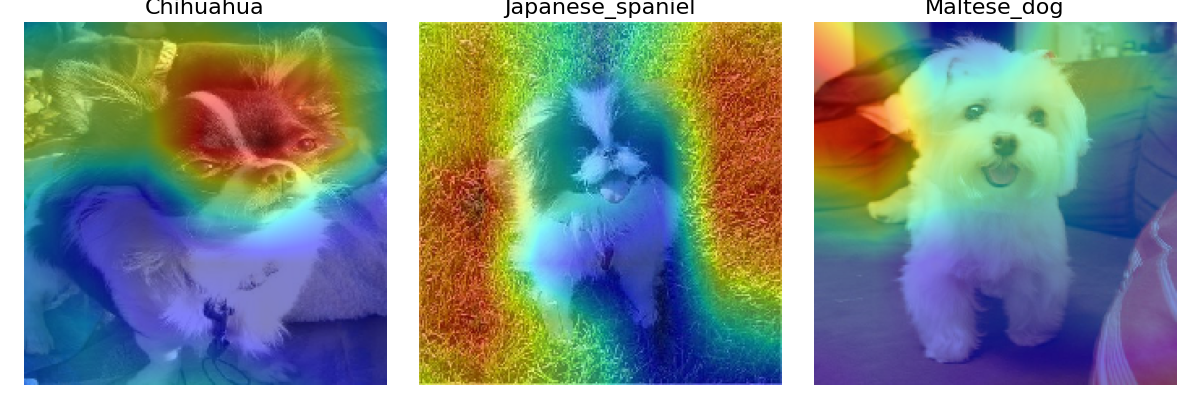
Figure 14: The Faster-ScoreCAM of the last conv layer (the last block). Unlike above, the heat maps of the Japanese Spaniel are on the background.
Conclusion
Sigh..., we have been confronted with many problems to complete this part. Though there are many bugs, we have also certainly accomplished a lot by solving them. From the problem of the static graph in Tensorflow which prevents showing the output shapes, tf.keras.layers.Layer, the use of get_config to overcome the problem of "NotImplementedError" to the use of tf.keras.vis for the Tensorflow custom model, all of them are valuable insights when learning Tensorflow.
References
[1] https://github.com/tensorflow/tensorflow/issues/25036#issuecomment-504125711
[2] https://github.com/tensorflow/tensorflow/issues/25036#issuecomment-542087377
[3] https://github.com/keras-team/keras/issues/12532#issuecomment-519031142